WOLFSSL FOR KEIL MDK-ARM v1.0
This is a getting started guide for using the wolfSSL lightweight SSL/TLS library with Keil MDK-ARM and uVision. This document is available on this page in HTML format, or available for download in PDF form.
Contents
- Getting Started
- Configuration
2.1 Selecting KEIL-RL Components
2.2 CyaSSL Wizard
2.3 KEIL-RL Wizard - Building your Apps
3.1 Building CyaSSL Library
3.2 Building App Framework - Release Files
1. Getting Started
The Keil MDK-ARM package has been tested with the following environment:
CyaSSL: Release v2.5.0
Tool Chain: MDK-ARM 4.71.0.0
Target OS, Middleware: KEIL-RL (RTX, RL-TCPnet, RL-FlashFS)
Target Hardware, Board: MCBSTM32F200 with STM32F207IG, on chip memory of 128kB RAM, 1MB Flash. ULINKpro for download and debug.
Start up steps:
- Set up the MPU board and KEIL-µVision IDE
- Connect USB Power, ULINKpro to the board, and Ethernet to the router if you plan to use SSL/TLS. Users who wish to use only the CTaoCrypt cryptography library do not need the Ethernet connection.
- Set up KEIL-µVision on the PC.
- Get the necessary source files
- Get the CyaSSL zip file (cyassl-x.x.x.zip). This includes Keil MDK-ARM specific files. Download and unzip the CyaSSL package under the appropriate folder. It includes the standard CyaSSL release files as well as MDK-ARM specific files. MDK-ARM specific files are located under the IDE¥MDK-ARM folder.
- STM32F2xx standard peripherals library
- Go to “my.st.com” and search for “STSW-STM32062”. Download “stsw-stm32062.zip”, unzip, and copy “Libraries\STM32F2xx_StdPeriph_Driver/{inc, src}” to the “IDE\MDK-ARM\STM32” folder, and “Project\STM32F2xx_StdPeriph_Template\stm32f2xx_conf.h” to “IDE\MDK-ARM\STM32F2xx_StdPeriph_Lib\inc”. - Rebuild and download to the board
- If your MDK-ARM files are installed under the default directory (c:\Keil), simply go to “KEIL-Project -> Projects” and double click on "MDK-ARM.uvproj " to start up the uVision IDE.
- If MDK-ARM is not installed in the default location, you need to change all of the referencing path definitions in the project file to the install location on your development machine. Please refer to “note a)” at the end of this section.
- Select "MDK-RL-FULL" target from the pull down menu: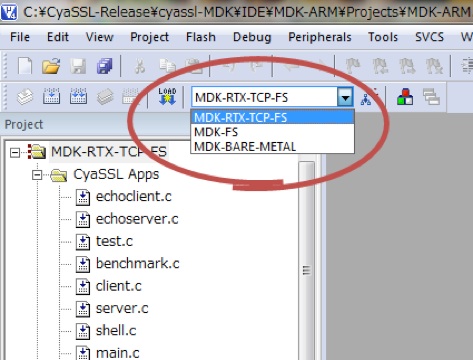 Rebuild the target using “Project -> Rebuild all target files”.
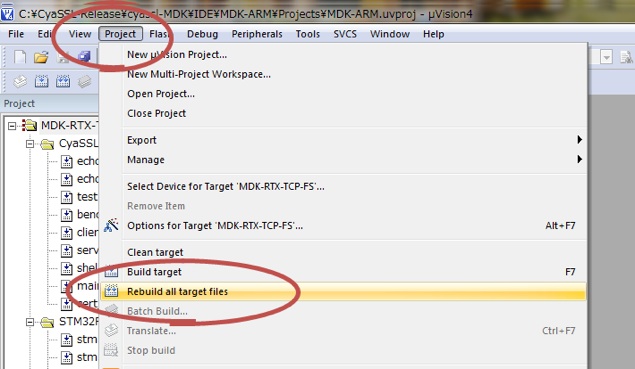
The compiled target file contains CyaSSL, MDK-RL (RTX, TCPnet and FlashFS), test apps and a tiny shell for invoking the apps through the PC keyboard.
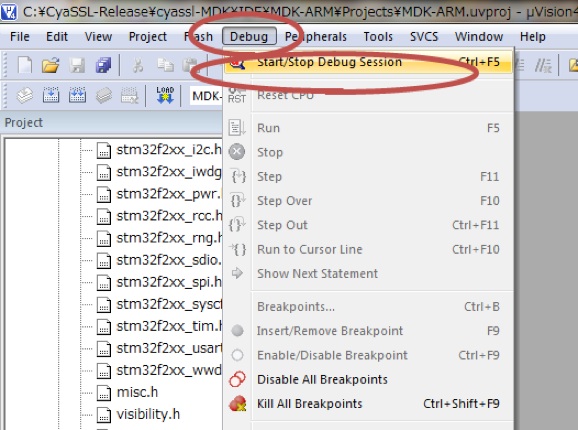
Download and start the debug session by selecting “Debug -> Start/Stop Debug Session”.
Select "Debug (printf) Viewer" from the UART tool button. Drag the top of the viewer to pop up and expand the window as desired.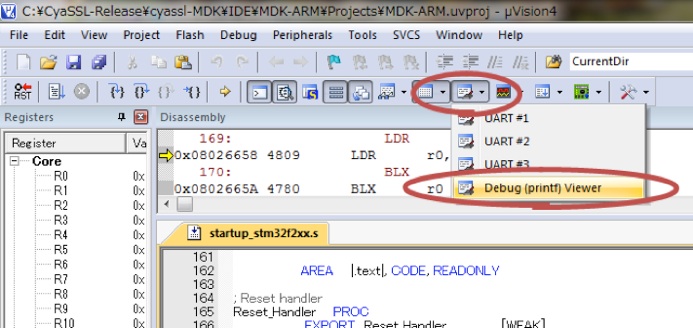
Make a copy of the certificate files under the “cert” folder to the SD card and insert it to the board’s SD card slot. Click the Start button to execute the downloaded program. You should see the shell start up message on the window.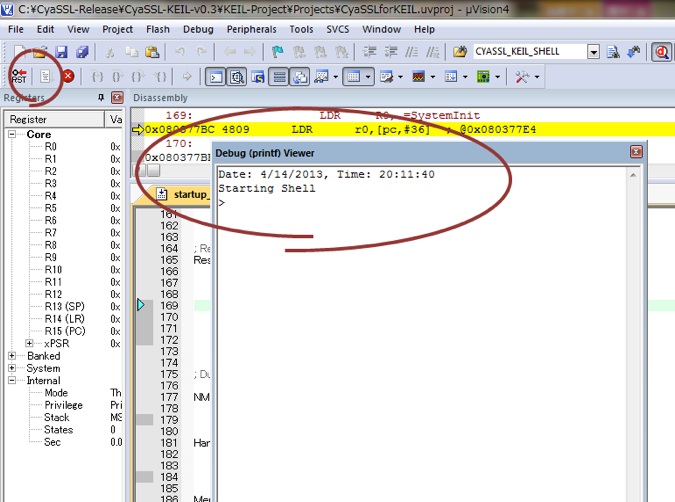
Place the mouse curser on the window and click to get focus on it. Now you are able to type in any of the available shell commands.
Date: 0/0/2048, Time: 00:01:10
Starting Shell
>
If the time displayed is not correct, set the RTC timer using the “time” command.
>time -d 4/4/2013 <- set date
>time -t 20:59:0 <- set time
>time <- get time
Date: 4/4/2013, Time: 20:59:02
Verify that the compiled CyaSSL library is working using the “test” command. For the tests that require keys and certificates, copy the files under “certs” folder to SD memory and insert it to the board prior to running the “test” command.
>test
MD5 test passed!
MD2 test passed!
MD4 test passed!
SHA test passed!
...
PWDBASED test passed!
ECC test passed!
You can also benchmark the library with the “benchmark” command.
>benchmark
AES 25 kB took 0.028 seconds, 0.86 MB/s
Camellia 25 kB took 0.031 seconds, 0.80 MB/s
...
ECC 256 key generation 252.11 milliseconds, avg over 5 iterations
EC-DHE key agreement 255.91 milliseconds, avg over 5 iterations
EC-DSA sign time 272.75 milliseconds, avg over 5 iterations
The “echoserver” command simply echoes messages received from the client. You can invoke the echoserver in background mode with a tailing “&”.
>echoserver&
"echoserver" is running with the background mode.
After starting the echoserver, start “echoclient” and type in a string of characters. The destination of “echoclient” is localhost (127.0.0.1), port 11111, while “echoserver” listens to port 11111 by default.
Use the “quit” command to terminate both the server and client.
>echoclient
ABCDEFG
ABCDEFG
1234567890
1234567890
quit
sending server shutdown command: quit!
client sent quit command: shutting down!
The “server” command starts a simple SSL/TLS server for single transaction. Its default listening port is 11111.
>server&
"server" is running with the background mode.
The “client” command has options for testing various protocol settings. Try using the “-g” option to make the client send a “HTTP GET” message. You should see the response from “server”. Its default destination is again localhost(127.0.0.1), port 11111. (See “client -?” option for further usage.)
>client -g
SSL connect ok, sending GET...
Client message: GET /index.html HTTP/1.0
Server response: I hear you fa shizzle!
You are also able to test a connection from the board to an external SSL server. Be sure the board is connected to the router and the destination. For example, start up a web server on a separate machine and a make sure a page using HTTPS is available. Invoke the “client” command with the following options, “-h” for the server IP address, “-p” for the server port and “-v” for specifying the TLS/SSL version to use. With “-g” option, the command tries to get the “index.html” page under the document root.
>client -h xxx.xxx.xxx.xxx -p 443 -g -v TLS1.1
SSL connect ok, sending GET...
Server response: HTTP/1.1 200 OK
Content-Type: text/html
...
</body>
</html>
Note a)
If MDK-ARM is not installed in the default installation location, you need to change all of the referencing path definitions in the project file to the install location.
Start up the project, ignoring the path error dialog boxes. After it has started, open each file’s property dialog box under the “MDK-ARM” file group and the following files under the “Configuration” file group:
startup_stm32f2xx.s, File_Config.c. Net_config.c, Net_debug.c
Each file can be opened by right clicking the file.
Change the “c:\Keil” string in the path to your installation folder.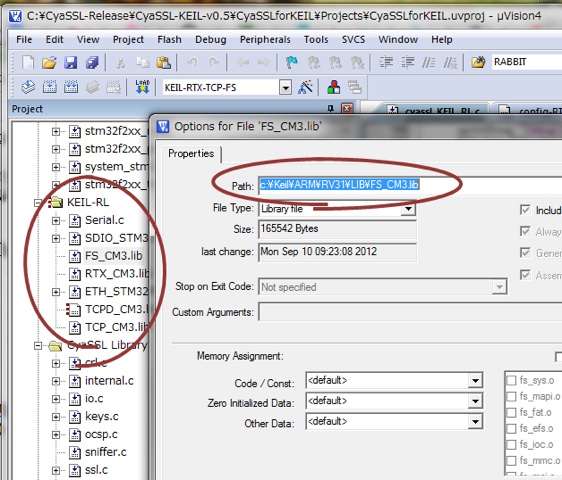
2. Configuration
CyaSSL for KEIL MDK-ARM allows the user to configure the library and applications with the following three layers.
- MDK-ARM Components
The package includes library files for RTX: multi-task RTOS, RL-TCPnet: TCP/IP protocol and RL-FlashFS: the file system. The user can choose an appropriate combination of the components to be included in the target application using the build target menu of the uVision IDE. - CyaSSL Configuration
The package includes the full feature set of the CyaSSL SSL/TLS and CTaoCrypt cryptography library. It also includes several sample applications and helper commands so that the user can explore and test the features of the library. The user can select specific sets of cryptography and cipher suites, SSL/TLS protocol versions, and other configuration parameters using the configuration wizard. - MDK-ARM Resource Configuration
The user can chose and set up specific configuration parameters for MDK-ARM components with the uVision configuration wizard.

2.1. Selecting KEIL MDK-ARM Components
There are three templates of the MDK-ARM components that are provided on the uVision build target pull down menu.
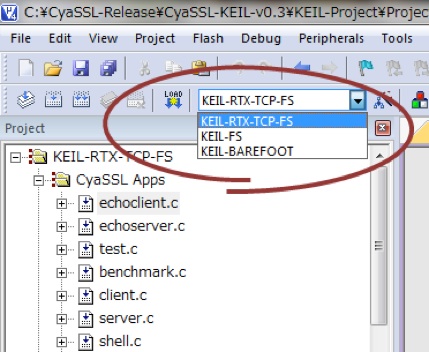
- MDK-RTX-TCP-FS is a complete build of the components. The target is executed in the multi-task mode under RTX. CyaSSL runs under the BSD Socket API of RL-TCPnet. It uses the RL-FlashFS API so that certificates and keys can be stored in SD memory on the board.
- MDK-FS is for users of the CTaoCrypt cryptography library only, building only with RL-FlashFS. Applications and the CyaSSL library run in single threaded mode without RTX. TCPnet is not included.
- MDK-BARE-METAL is also for use with the CTaoCrypt library when the user wants minimum resource usage in the final executable image. Certificates and keys need to be stored in memory buffers. (See CyaSSL Wizard option.)
2.2. wolfSSL Wizard
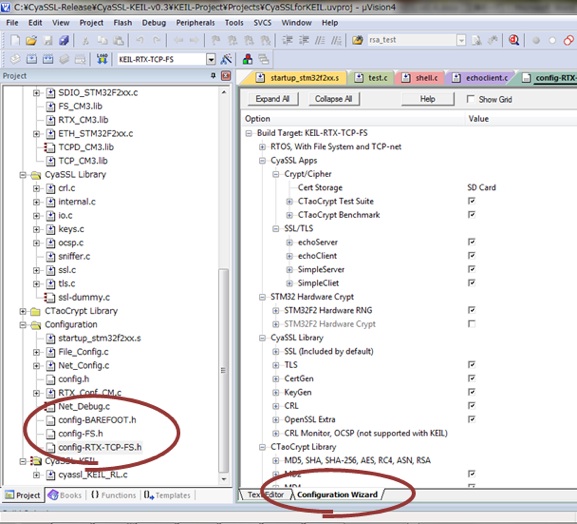
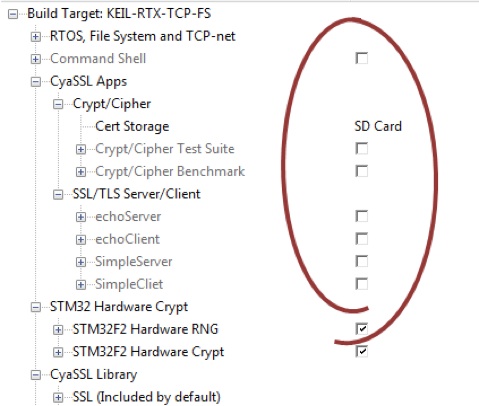
The wolfSSL configuration wizard is displayed by double clicking config-RTX-TCP-FS, config-FS or config-BARE-METAL in the “Configuration” file group. Select “Configuration Wizard” tab below the window for the wizard view. The user can select components to be included in the build or other options by selecting them in the wizard. For further information about the details of the build options, see “Chapter 2: Building wolfSSL” in the wolfSSL user manual.
2.3. MDK-ARM Wizard
Other MDK-ARM configuration wizards are available under the Configuration file group. Those configuration files are shared among all the build targets and include the files listed below.
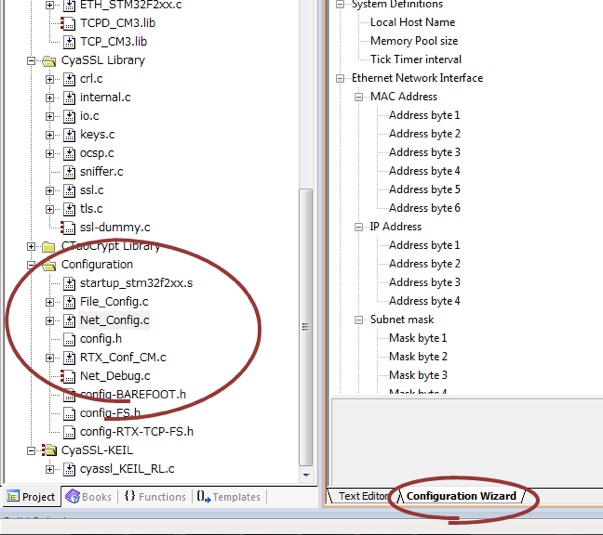
- Startup_stm32f2xx.s
Configures stack and heap memory sizes. This stack is used when single thread mode without RTX is selected. When RTX is used, this stack is used for the startup routine. The default stack size configuration accommodates either mode.
- Net_Config.c
Configures RL-TCPnet parameters. The user needs to set up the board’s IP and MAC address.
The default configuration allocates just enough sockets and other resources to execute the CyaSSL examples.
- RTX_Conf_CM.c
The default configuration allocates just enough tasks for the CyaSSL examples. The example tasks using SSL/TLS (echoclient/echoserver, client/server) use statically allocated 12 Kbytes of stack space instead of using the stack defined for RTX task with the RTX wizard.
- File_Config.c
The default configuration enables SD memory file system.
- Net_Debug.c
This configuration file needs to be enabled when TCPD_DM3.lib is used for network debug purpose. With the default build, the file is not included in the build.
3. Building Your Apps
3.1. Building CyaSSL Library
For building the CyaSSL library to be linked with your application, remove all CyaSSL apps and shell in the CyaSSL configuration Wizard (config-RTX-TCP-FS.h/config-FS.h/config-BARE-METAL.h)
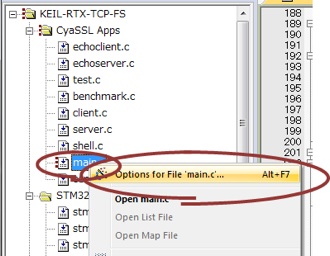
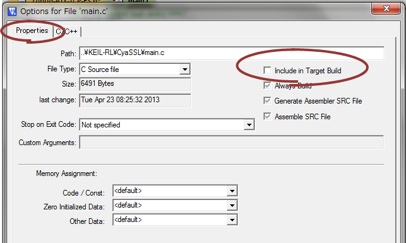
Select “Options for File main.c”, and remove “main.c” from the build.
Select “Project” -> “Option for Target”, select the “Output” tab, and then select “*.lib” for the output.
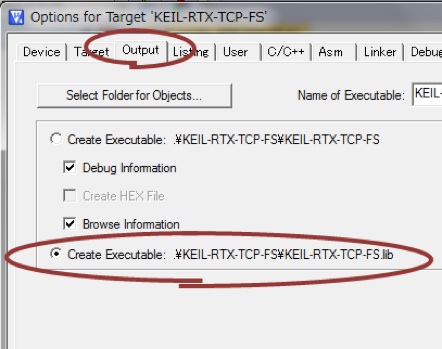
Select “Project” -> “Rebuild All Target Files” and get the *.lib file under the build folder.
3.2. Building App Framework
If you want to use CyaSSL for KEIL MDK-ARM as an application framework and add your application into the framework, remove all CyaSSL apps and shell in the CyaSSL configuration Wizard (config-RTX-TCP-FS.h/config-FS.h/config-BARE-METAL.h).
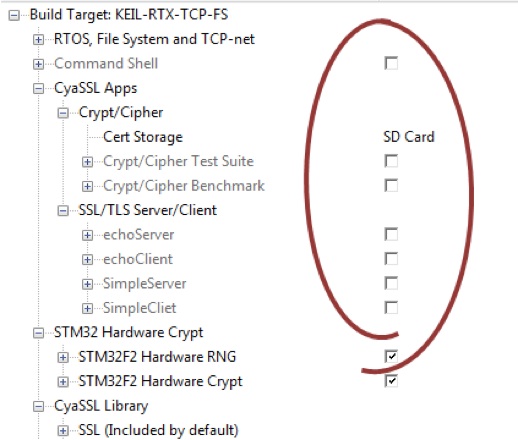
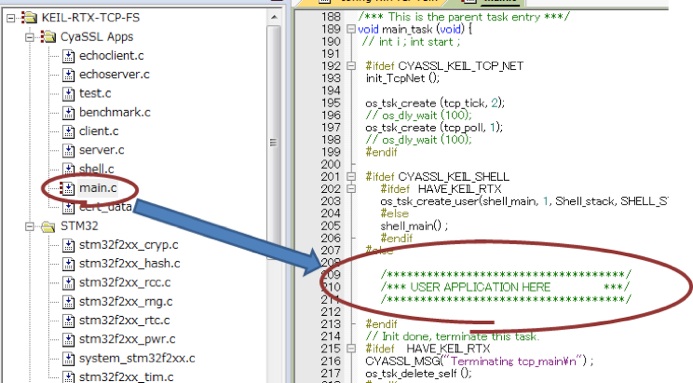
Create a file group for your application by using the “Add Group” menu and clicking “Add Files to Group”. Insert a function call to the entry function of your application in “main.c” located in the “CyaSSL apps” file group.
4. Release Files
The CyaSSL zip file (cyassl-x.x.x.zip) contains the standard CyaSSL release files and MDK specific files. MDK specific files are placed under IDE\MDK-ARM folder, while all others are kept in the standard CyaSSL release folder structure.
The following are brief descriptions of the folders included in the download package:
certs: Cert and Key files
ctaocrypt: files for CTaoCrypt cryptography library
cyassl: CyaSSL header files
examples: Example app files.
src: files for CyaSSL library
IDE\MDK-ARM: KEIL specific files.
MDK-ARM
config: Configuration Wizard
CyaSSL: CyaSSL files for KEIL
cyassl_KEIL_RL.c (CyaSSL KEIL-RL adjustment), main.c, shell.c, config.h
Projects: MDK-ARM uVision Project files
STM32F2xx_StdPeriph_Lib: STM32 standard peripheral drivers, start up

